
About this manual
Thank you for using the somatic cell cout tester. In order to enable you to operate the device proficiently as soon as possible, we have provided a detailed instruction manual. When you install and use this instrument for the first time, please be sure to read all the accompanying information carefully. In order to improve the performance and reliability of the instrument, we sometimes make some changes to the instrument (including hardware and software). At that time, we will modify or add information, but there may still be inconsistencies in some descriptions. If there are any errors and omissions in this instruction manual, you are warmly welcome to correct them.
This manual describes the purpose, functions and operation methods of the product in detail. Before using this product, please read and understand the contents of this manual carefully to ensure that you can use this product correctly and ensure the safety of the operator.
All illustrations provided in this manual are for reference only. The settings or data in the illustrations may not be exactly the same as the actual display you see on the product.
Statement
The manufacturer owns the copyright of this non-publicly published instruction manual and has the right to treat it as confidential information. This instruction manual is only used as a reference for operating, maintaining and repairing the product, and no one else has the right to disclose this instruction manual to others. This instruction manual contains proprietary information protected by copyright law, all copyrights reserved, and no part of this instruction manual may be photographed, copied or translated into other languages without the written consent of the manufacturer.
Product contents
1.1 Product Introduction
1.2 Somatic Cell Cout Tester
1.3 Chip
1.4 Reagents
1.2 Somatic Cell Cout Tester
1.3 Chip
1.4 Reagents
Key performance indicators
2.1 Outer packaging inspection
2.2 Installation and Fixing
2.3 Power connection
2.4 Tester On/Off
2.2 Installation and Fixing
2.3 Power connection
2.4 Tester On/Off
Operation
3.1 Sample preparation
3.2 Sample testing
3.3 Cancel detection
3.4 Results query
3.2 Sample testing
3.3 Cancel detection
3.4 Results query
Set Up
Precautions
Product contents
1.1 Product Introduction
SCCT is an automatic somatic cell counting instrument based on the principle of fluorescence microscopy. It is used to count somatic cells in raw milk, providing quantifi-able scientific data for quality control and product development of dairy products, as well as the prevention and control of dairy cow diseases in pastures. SCCT counting and analysis system consists of three parts: SCCT instrument, SCCT chip and SCCT reagent, which are described one by one below.
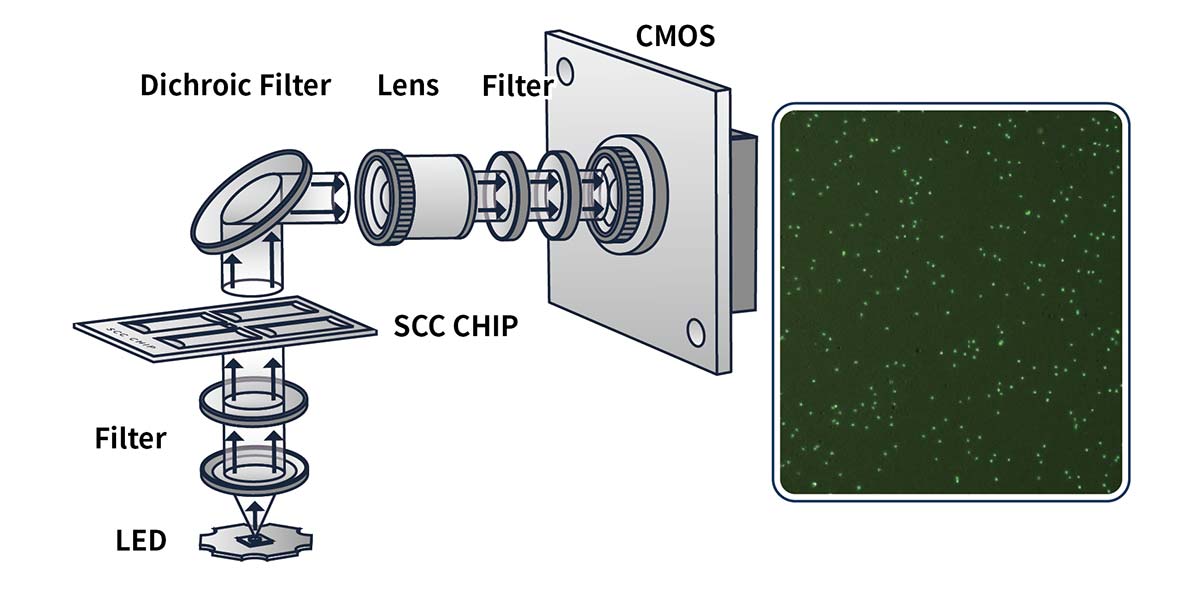
Figure 1 Schematic diagram
1.2 Somatic Cell Cout Tester
Below are the front and rear views of the instrument.
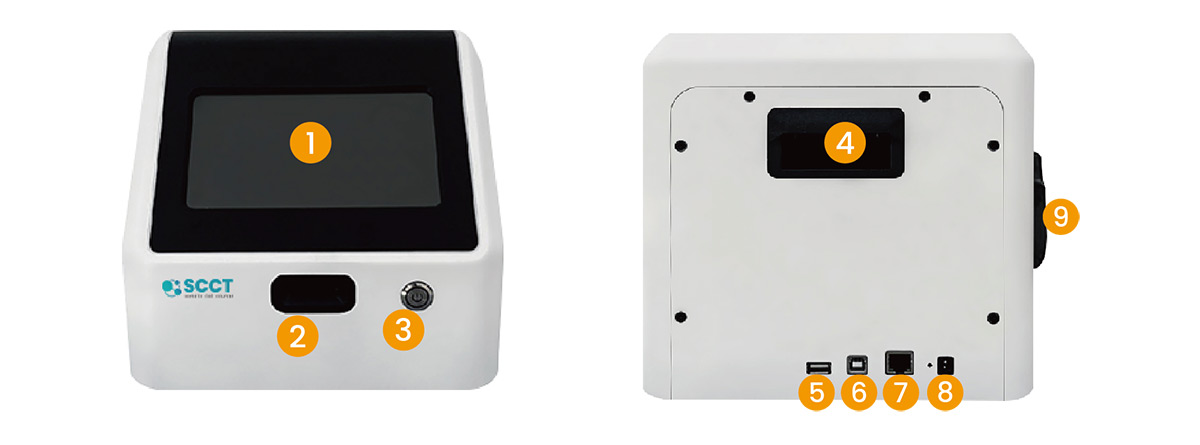
Figure 2 Front and rear views of the instrument
| Serial Number | Name | Description |
|---|---|---|
| 1 | LCD | Display processes and results. |
| 2 | Door | Chip is inserted and ejected. |
| 3 | Power | Power on/off. |
| 4 | Clasp | Easy to pick up or put down the instrument |
| 5 | USB interface | After inserting the USB flash drive, you can export data and upgrade the software. |
| 6 | Serial Port | Debugging interface. |
| 7 | Network port | Connect to the Internet. |
| 8 | Power interface | Connect the power adapter. |
| 9 | Printer | Print test results. |
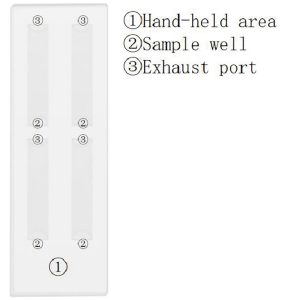
1.3 Chip
Each chip has four flow channels, and each flow channel
is added with 8.5 µl of sample, so four samples can be
tested at the same time. This chip is a single-use
consumable and should be placed in a biological waste
bin after the test is completed. It should not
be discarded at will.
is added with 8.5 µl of sample, so four samples can be
tested at the same time. This chip is a single-use
consumable and should be placed in a biological waste
bin after the test is completed. It should not
be discarded at will.
1.4 Reagents
The somatic cell reagent is dried in a centrifuge tube
and stored at room temperature away from light.
When used, add 100ul of sample to each reagent
tube. The main component of the reagent is the
highly efficient fluorescent dye, which stains quickly
and produces clear images.

Key performance indicators
The main performance parameters are as follows:
Instrument | Detection range | 0-200*10e4/mL |
| Detection time | <180sec/test | |
| Voltage | DC 12V | |
| Current | 3.0A | |
| Screen | 7-inch | |
| Overall dimensions(L*W*H) | 230mm*245mm*215mm | |
| Weight | 2.7kg | |
| Repeatability | 50* 10e4/mL sample, CV<5% | |
| Accuracy | Deviation<10% | |
| Work Environment | Temperature | 10°C~40°C |
| Humidity | 10%~85% | |
| Pressure | 86kPa~106kPa | |
| Conditions of | Temperature | 10°C~35°C |
| Humidity | ≤80% (No Condensation) | |
| Test chip | Sample size | 8.5µL/Channel |
| Shelflife | l year | |
Reagents | Storage conditions | Room temperature, away from light |
| Shelflife | 1 year | |
| Sample size | 100 µL/tube |
2.1 Outer packaging inspection
The testers are strictly inspected by our professionals before packaging and transportation, and the products are transported to the installation site by designated transportation companies.
After receiving the tester, please carefully check the outer packaging before unpacking to see if there are any of the following conditions:
- Obvious deformation
- Traces of water immersion
- Traces of impact
- Signs of being opened
If you find any of the above situations, please do not open the box and immediately notify the local dealer or our after-sales service personnel.
2.2 Installation and Fixing
Somatic cell cout tester has a direct impact on the normal operation of the equipment and the accuracy of the test results. Please pay attention to the following matters:
- The tester needs to be placed horizontally without blocking the plate inlet;
- Avoid direct sunlight and other potential heat sources;
- 30cm from surrounding objects to ensure a good heat dissipation environment and facilitate connection with power supply or other devices.
2.3 Power connection
Insert the DC plug of the power adapter into the power jack at the rear of the tester, and then insert the AC connector of the power adapter into the mains socket (the mains socket must be grounded) . Insert the DC plug of the power adapter into the bottom of the power jack at the rear of the tester, indicating that the tester and the power plug are connected in place. If not, the power supply may be poorly connected.
2.4 Tester On/Off
After the power is turned on, press the power button on the front panel for about 2 seconds, the tester starts, the power button indicator lights up, the display lights up, and the power-on interface shown in Figure 5 is displayed :

Figure 5 Boot interface
During the startup process, the tester will perform a basic function self-test and reset. After the self-test is completed, it will enter the test page. The screen display is as shown in Figure 6 below :
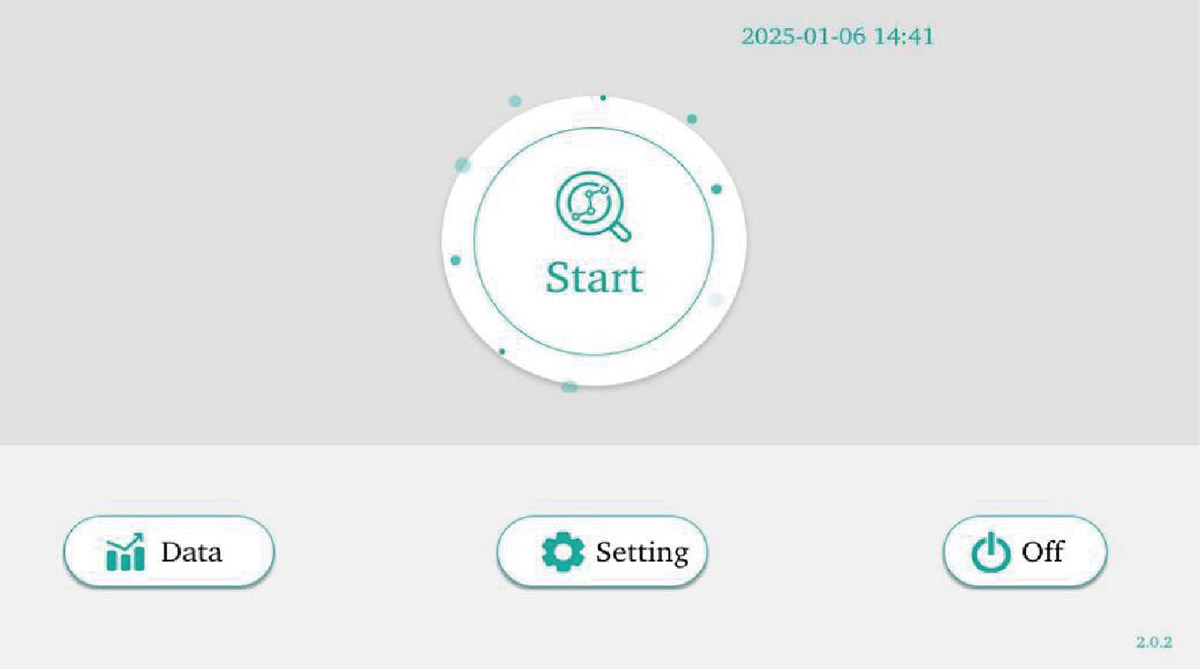
Figure 6 Main interface
If the instrument fails to self-check, the interface will prompt an error code. Please contact the manufacturer, https://somaticcellcounttester.com
| Error code | Cause |
|---|---|
| 1 | GPIO initialization failed. |
| 2 | Serial port initialization failed. |
| 3 | Camera initialization failed. |
| 4 | Motor reset failed. |
When shutting down the tester, click the" " button on the main interface to shut down the tester. Click the "OK" button in the pop-up dialog box to shut down the tester. The screen is displayed as follows. After shutting down, the indicator light of the power button on the front panel of the tester goes out.
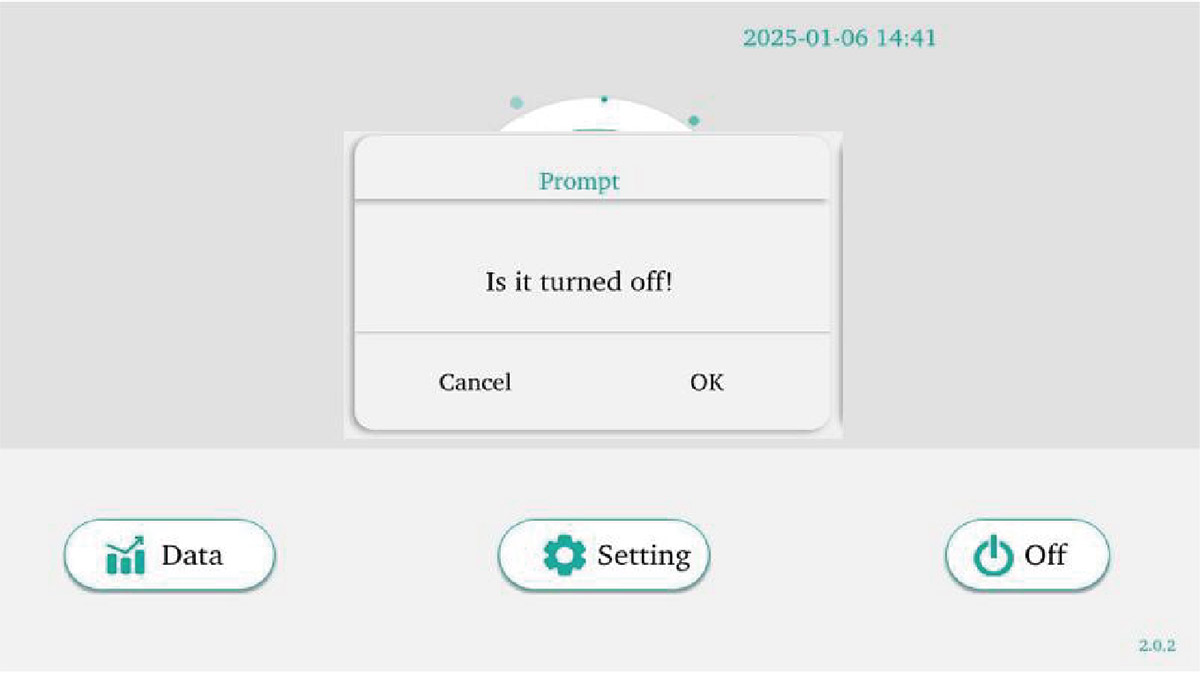
Figure 7 Shutdown prompt
Operation
This chapter will introduce you how to use this instrument to detect somatic cells in milk.
3.1 Sample preparation
The testing process mainly includes five steps: milk sample warming, milk sample mixing, sample processing, sample addition, and result interpretation, as shown in Figure 8 below :
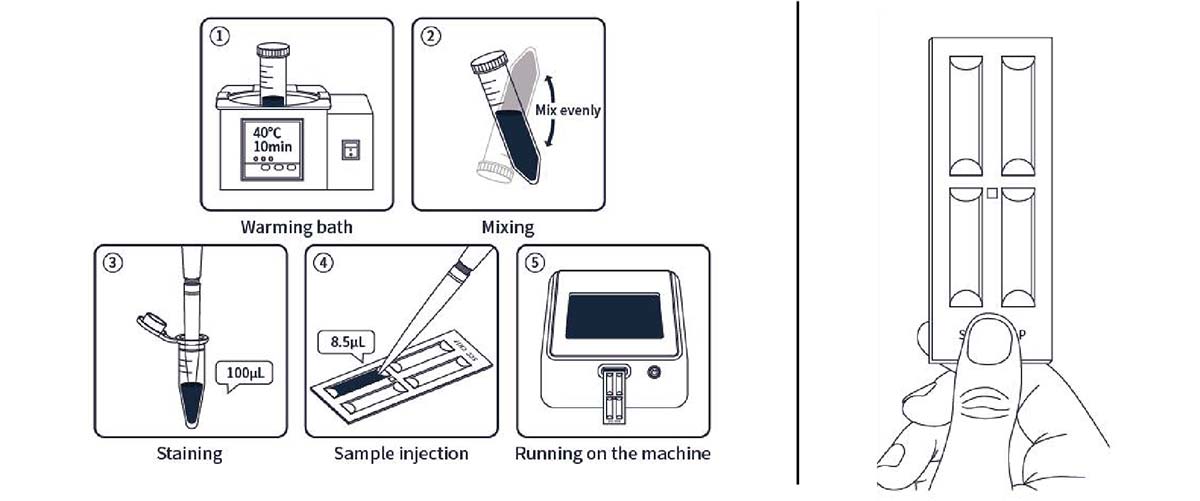
Figure 8 Testing process
1. The test sample should be raw milk. If it is a refrigerated milk sample, it needs to be warmed in a 40°C water bath for 10 minutes before testing (if the diameter of the sample tube is greater than 15mm, the warming time is increased to 20 minutes).
2. After the milk sample has rewarmed, mix it by inverting it 8-10 times to mix it thoroughly.
3. Take 100µL of milk sample and add it to the reagent tube. Shake it 8-10 times to ensure that the reagent is redissolved. Let it stand at room temperature for 3 minutes and then pipette and shake it again 8-10 times to mix it evenly.
4. After mixing, take 8.5µL of sample and add it dropwise to the sampling port of the counting plate to complete the sample injection.
5. the counting slide horizontally into the instrument for testing.
3.2 Sample testing
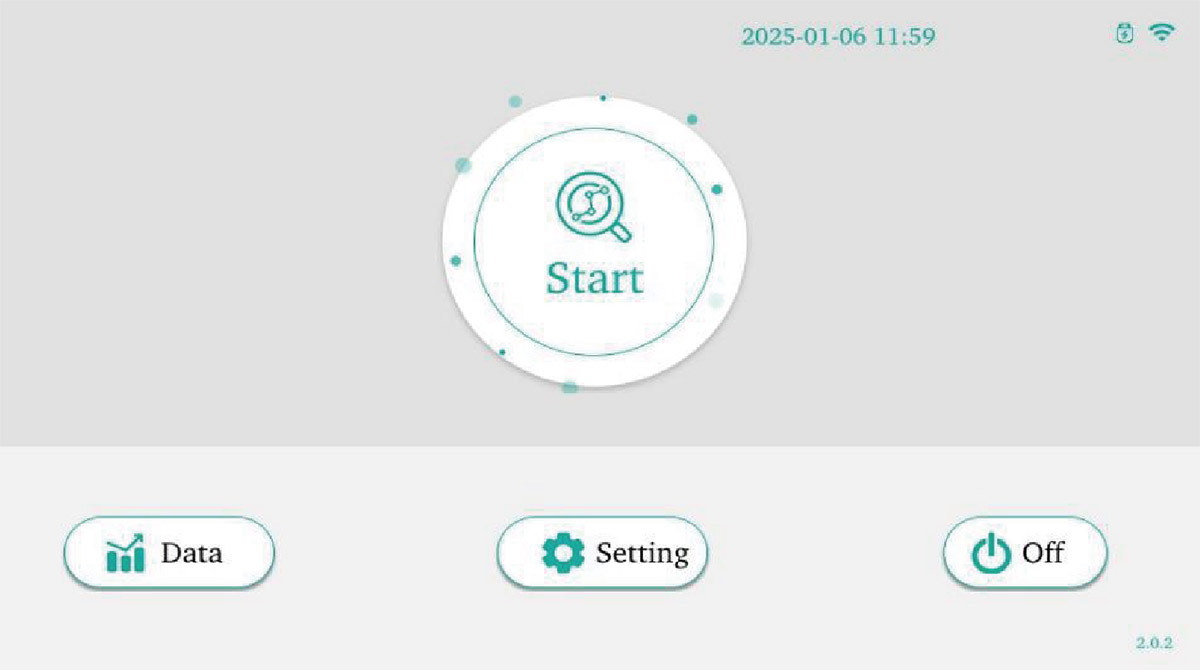
Figure 9
"Start" button on the screen to display the prompt interface, showing the user the steps to prepare the sample . The screen display is as follows:
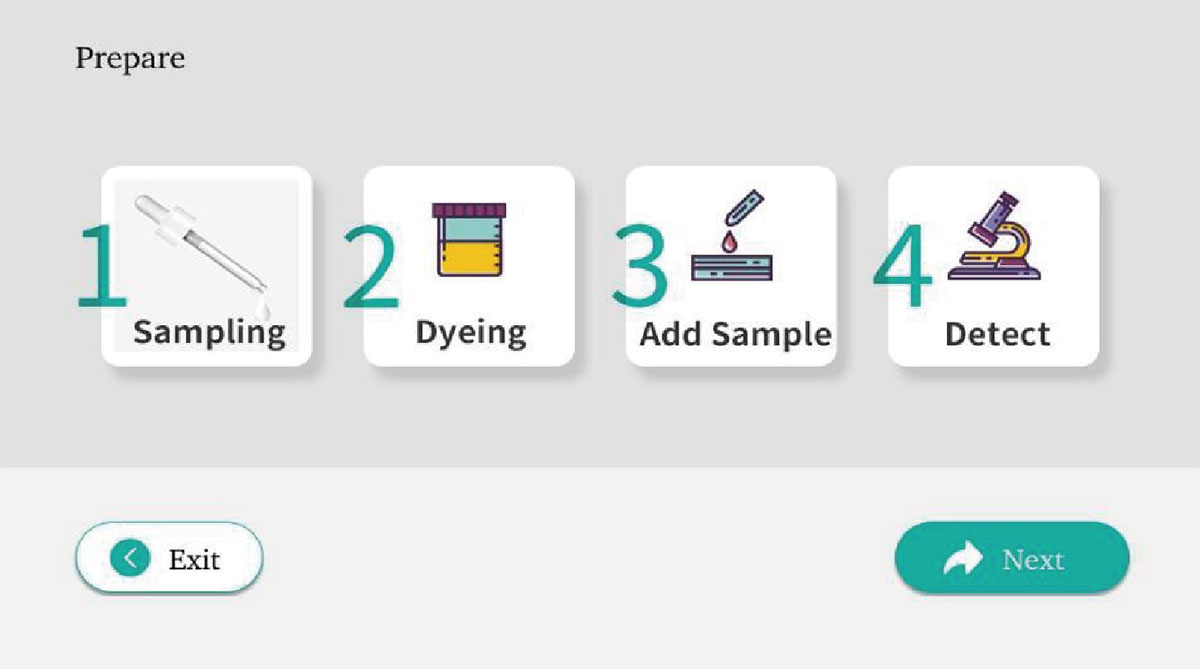
Figure 10
After the sample preparation is completed, click "Next" to enter the information entry interface. The screen displays as follows:
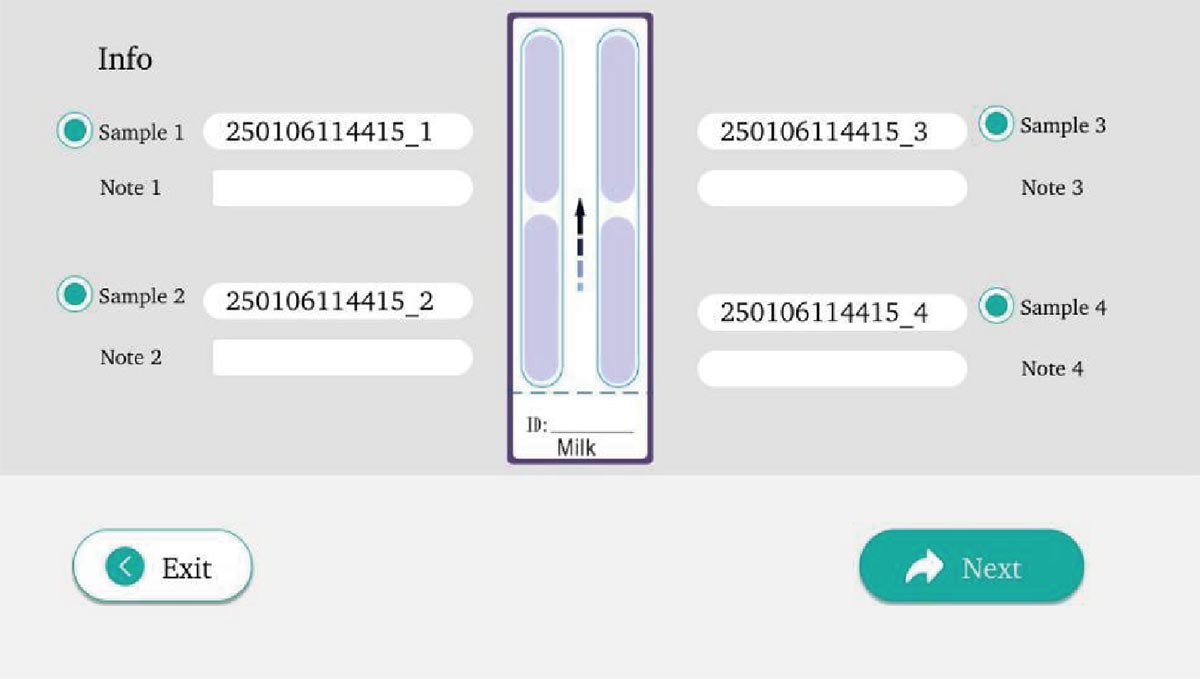
Figure 11
If you need to modify the ID or Note, click the corresponding text box. If you need to detect a single or multiple flow channels , select the corresponding flow channels in order. By default, four flow channels are detected at the same time. After the modifi-cation is completed, click "Next" to enter the detection interface. The screen displays as follows:
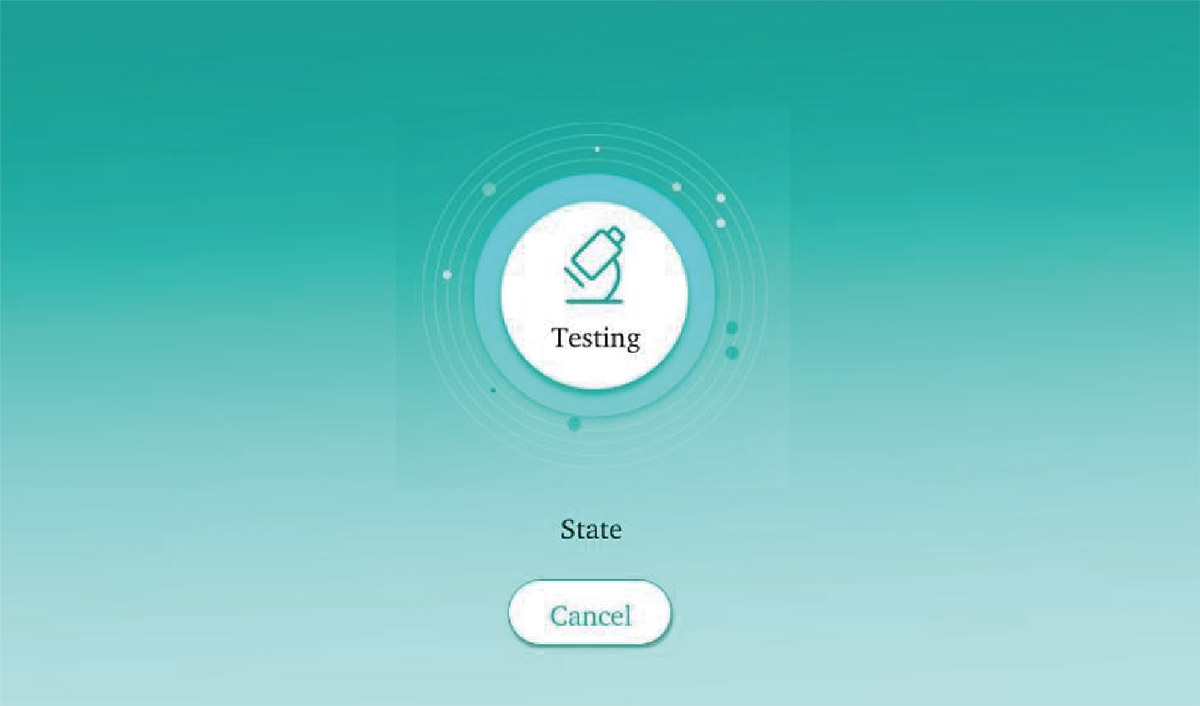
Figure 12
The detection process lasts about 1 min 30sec. After the detection is completed, the test results are output and the screen displays as follows:
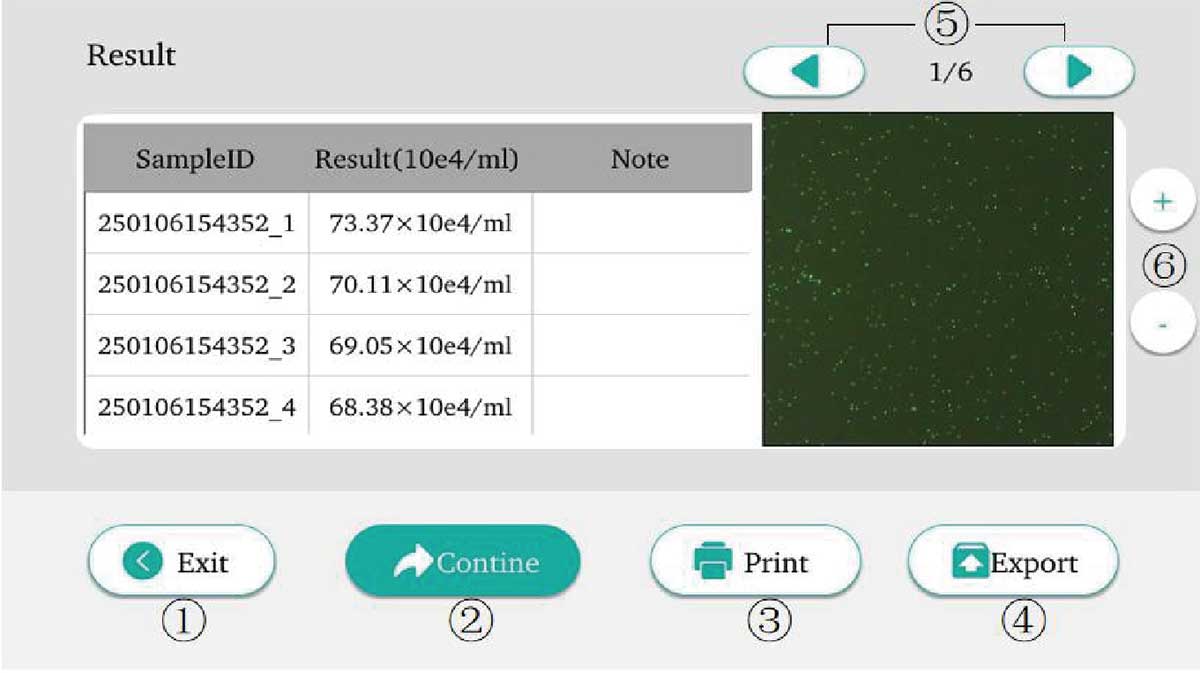
Figure 13
| Button | Function |
|---|---|
| ①Exit | Return to the main interface. |
| ②Continue | Continue to next test. |
| ③Print | Print the results. |
| ④Export | Export the detected image to a USB flash drive. |
| ⑤ | View the previous or next image. |
| ⑥ | Zoom in or out. |
3.3 Cancel detection
If you need to cancel the current test of the tester under special circumstances, the operation method is as follows:
- In the detection interface, click the "Cancel" button on the screen, and a confirmation prompt interface will appear;
- Click the "OK" button to confirm the "Cancel Detection" command. The tester sends the motor exit command and returns to the main interface.
- Remove the counting sheet.
3.4 Results query
The tester test results are stored in the tester database. Click the "Data" button on the main interface to view the results.

Figure 14
| Button | Function |
|---|---|
| ①Result | View the specific detection image ofthe selected sample. |
| ②Query | View therequired data according tothe ID number. |
| ③Delete | Short press this button to delete the current data; long press can delete the current page or clear all data. |
| ④Export | Export the detected image of the selected sample to a USB flash drive. |
| ⑤Exit | Return to the main interface. |
Set Up
Click the "Setting" button on the main interface to enter the system settings interface. The screen displays as follows:
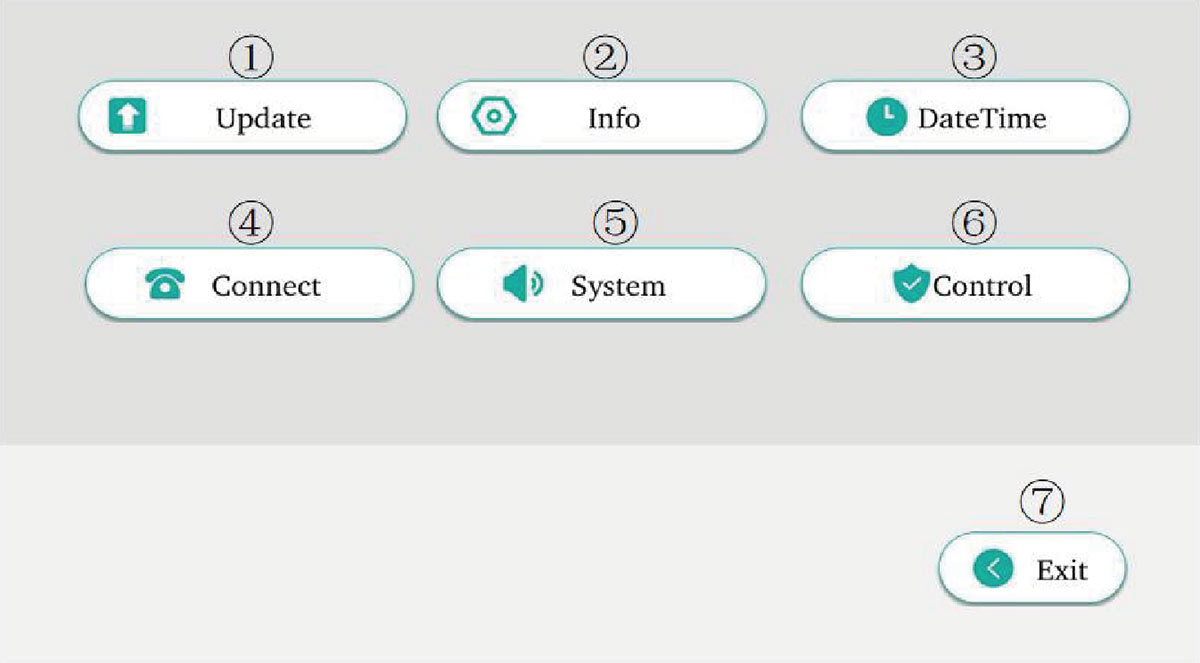
Figure 15
| Button | Function |
|---|---|
| ①Update | After connecting to the Internet, the latest software version can be automatically detected and software upgrades can be achieved. |
| ②Info | Setup information, such as setting units. |
| ③DateTime | Setting the time. |
| ④Connect | Networking. |
| ⑤System | Set the sound, printing method, and language. |
| ⑥Control | Quality control. |
| ⑦Exit | Return to the main interface. |
Precautions
Warning: Use the original adapter and ground it effectively;
- If the instrument is loose or dropped, do not use it and contact after-sales support;
- Do not use the instrument in an inclined, vibrating or unstable environment;
- Do not spill liquid on or inside the instrument;
- Power plug first;
- There should be a gap of at least 5cm between the instrument and the surrounding walls to facilitate heat dissipation;
- Do not stack other items on the surface of the instrument;
- Remove the chip in time;
- When handling potential contaminants, personal protection should be taken, and samples and test reagents should be handled as required , and instruments should be cleaned and disinfected regularly.