Many first-time users feel nervous when they open a somatic cell count tester. They worry about what a high somatic cell count could mean for their animals and the milk they produce. The idea that white blood cells in the udder may signal a hidden problem, like sub-clinical mastitis, adds to their concerns. Some users also feel unsure about how long non-antibiotic treatments might take to work. This post aims to help new users feel more confident and prepared.
Key Takeaways
The somatic cell count tester arrives in sturdy packaging, ensuring safe transport and easy identification of contents.
Unboxing is straightforward, with clear labeling and organized compartments for each item, making setup quick and simple.
Calibration is essential for accurate results; always follow the manual’s instructions before testing milk samples.
Proper sample preparation, including gentle mixing and accurate dilution, is crucial for reliable test outcomes.
Regular use of the tester helps monitor udder health and improve milk quality, supporting better dairy management.
Packaging Impressions
First Look
The box for the somatic cell count tester arrives in sturdy cardboard. The packaging feels solid and well-sealed. A clear product label sits on the top, making it easy to identify the contents. The manufacturer uses protective foam inserts to keep the device safe during shipping. No dents or damage appear on the outer box, which gives a good first impression. The design of the packaging looks professional and clean. Many users notice the attention to detail, such as the printed logo and the tamper-evident seal. These features help build trust in the product’s quality.
Note: Always check the seal before opening to ensure the kit has not been tampered with.
Unboxing Steps
Unboxing the somatic cell count tester follows a logical sequence.
First, users cut the tape and lift the lid.
The user manual sits on top, easy to spot and remove.
Underneath, the main device rests in a custom foam slot.
Accessories, such as sample tubes and pipettes, sit in separate compartments.
Each item has a clear label, which helps users identify parts quickly.
A quick reference card often comes with the kit. This card lists the steps for setup and first use. The packaging keeps all items organized and prevents shifting during transport. Users find that the careful arrangement reduces the risk of losing small parts. The unboxing process takes only a few minutes. Even those new to lab equipment can complete it without confusion.
Item
Packaging Feature
Main Device
Custom foam slot
User Manual
Top layer, easy access
Accessories
Separate compartments
Quick Reference Card
Included, visible
The overall experience shows that the manufacturer values both protection and user convenience. The somatic cell count tester arrives ready for a smooth setup.
Somatic Cell Count Test Kit Contents
What’s Inside?
A new user opening a somatic cell count test kit will find several essential items. The main device, known as the somatic cell count tester, sits securely in its foam compartment. The user manual rests on top, providing clear instructions for setup and operation. Each accessory has its own labeled space, making identification simple.
Manufacturers often include a range of consumables to support multiple tests. For example, a typical kit may contain:
These items arrive in protective packaging. Labels on each component use large, easy-to-read fonts. This attention to detail helps users avoid confusion during setup.
Tip: Always check the labels before use to ensure the correct accessory is selected for each step.
Accessories Overview
Accessories play a key role in the testing process. The kit includes pipette tips, test chips, and dye ampoules. These items allow users to prepare and analyze milk samples efficiently. Leading brands, such as LACTOSCAN and Page & Pedersen, offer similar accessories in their kits. The table below compares the included items across popular brands:
Each accessory arrives in its own compartment, protected from damage. The clear labeling and organized layout help users find what they need quickly. The somatic cell count tester and its accessories work together to deliver accurate results with minimal hassle.
Setting Up the Somatic Cell Count Tester
Initial Assembly
The setup process for the somatic cell count tester remains straightforward. Most users find that they do not need advanced technical skills. The user manual provides step-by-step instructions with clear diagrams. Each part fits together without force. The main device sits on a flat surface. Users insert the power cable into the correct port. The display screen lights up when the device receives power.
A checklist helps users confirm that all parts are present before assembly:
Main device
Power cable
Sample holder
Pipette and tips
Test chips
Tip: Place all components on a clean, dry surface to prevent contamination.
The assembly process usually takes less than ten minutes. Users appreciate the labeled parts and the logical order of steps. The manual uses simple language, which helps new users avoid mistakes.
Calibration Process
Calibration ensures accurate test results. The user manual highlights this step as essential. Before running any milk samples, users must perform an initial calibration. The device prompts users to insert a calibration chip or solution. The screen displays instructions for each step.
A typical calibration process includes:
Insert the calibration chip into the sample holder.
Follow the on-screen prompts to start calibration.
Wait for the device to complete the process.
Remove the calibration chip when finished.
Note: Skipping calibration can lead to incorrect readings.
The somatic cell count tester stores calibration data for future tests. Users should repeat calibration if they move the device or after a set number of tests. Regular calibration maintains accuracy and builds confidence in the results.
Using the Somatic Cell Counter for Milk
Powering on
A user begins by placing the somatic cell counter for milk on a stable surface near a power source. The power cable connects to the device and the outlet. When the user presses the power button, the display lights up and shows the startup screen. The device runs a quick self-check. This step ensures that all internal systems function correctly before testing begins. The screen then prompts the user to select the type of test. Most models feature a simple menu with clear icons. This design helps both new and experienced users navigate the options without confusion.
Tip: Always check that the device completes its self-check before moving to the next step. This process helps prevent errors during milk analysis.
Sample Preparation
Proper sample preparation is essential for accurate results. The user collects a fresh milk sample from the dairy animal. Clean collection tools reduce the risk of contamination. According to laboratory guidelines, the sample must be diluted. Dilution ensures that somatic cells spread evenly throughout the liquid. This step prevents clumping, which can affect the accuracy of the somatic cell count.
Some advanced users follow a more detailed process. They may use high-temperature short-time pasteurization for whole raw milk. After pasteurization, the sample sits at 4°C for 22 hours. Gravity separates the milk layers, allowing the user to isolate somatic cells. This method helps prepare stock solutions with different somatic cell counts. Most dairy farms, however, use the standard dilution method for daily testing.
A typical sample preparation process includes:
Collect milk from the dairy animal using a sterile container.
Mix the sample gently to ensure even distribution of somatic cells.
Dilute the milk according to the instructions in the user manual.
Use a pipette to transfer the correct volume into a test tube or chip.
Note: Accurate dilution and mixing are critical. Skipping these steps can lead to unreliable results.
Running the Test
After preparing the sample, the user inserts the test chip or tube into the somatic cell counter for milk. The device recognizes the sample and displays the next steps on the screen. The user selects the test mode and confirms the sample type. The device then begins the analysis.
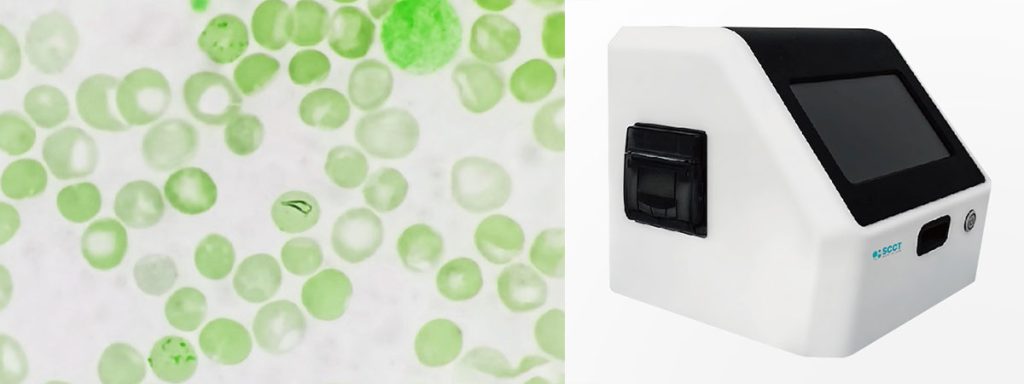
During the test, the somatic cell counter for milk uses imaging or fluorescence technology to count the cells. The process takes only a few minutes. The screen shows a progress bar and estimated time remaining. When the test finishes, the device displays the somatic cell count for the milk sample.
Recent studies show that the somatic cell counter for milk provides results similar to those from traditional laboratory methods. The image cytometer, a common type of on-farm analyzer, matches the performance of flow cytometry. Sensitivity and specificity rates reach over 90%. The device maintains high precision, especially when analyzing larger numbers of images. This reliability makes the somatic cell count tester a valuable tool for dairy farmers.
The user records the results and removes the test chip. Cleaning the sample holder after each test prevents cross-contamination. Many devices store previous results, allowing users to track trends in milk quality over time.
Callout: Consistent use of the somatic cell counter for milk helps dairy producers monitor udder health and improve milk quality.
User Experience and Learning Curve
Interface and Controls
The interface of most modern somatic cell count tester features a clear digital display. Users see large icons and simple menus. The touchscreen responds quickly to light taps. Each button has a clear label, which helps users select the correct test for milk samples. The main menu often includes options for starting a new test, viewing previous results, and adjusting settings. Many testers use color-coded prompts to guide users through each step. This design reduces confusion, especially for those new to dairy testing equipment. The controls feel intuitive, so users can focus on preparing milk samples rather than learning complex software.
Reading Results
After the test finishes, the device displays the somatic cell count on the screen. The number appears in large, bold digits. Some testers also show a color bar or warning icon if the milk sample has a high cell count. This feature helps dairy workers spot problems quickly. The results screen may include extra information, such as the date, time, and sample ID. Users can print the results or save them for future reference. Many testers store a history of milk tests, which allows dairy managers to track trends in udder health. Accurate reading of results supports better decision-making on the farm.
Tips For Beginners
Beginners often want to achieve the most accurate results when testing milk. The following tips help new users avoid common mistakes and improve their skills:
Handle milk samples gently to keep cells viable and reduce debris.
Mix each milk sample thoroughly, but avoid creating bubbles or causing stress to the cells.
Test the milk soon after mixing to prevent cells from settling.
Filter milk samples to remove clumps that could affect the count.
Dilute milk according to the tester’s instructions for best accuracy.
Focus on counting only viable cells in the milk.
Wash and filter milk samples to minimize debris.
Use the same procedure for every milk test to ensure consistent results.
Run multiple tests on the same milk sample and average the results for better precision.
Consider using automated features of the tester to save time and improve accuracy.
Tip: Consistency in sample handling and testing methods leads to more reliable milk quality data for any dairy operation.
First Impressions and Recommendations
Standout Features
Many users notice several strengths when they use a somatic cell count tester for the first time. The device provides rapid results for both clinical and subclinical mastitis. This speed allows dairy workers to respond quickly to health issues in cows. The tester also confirms negative quarters during early lactation, which helps manage cow health at critical times. Cow-side testing makes it easy to assess milk quality and udder health without sending samples to a lab. These features support better decision-making on the farm and improve the overall quality of milk.
Milking procedures should be reviewed. Better routines minimize stress for cows and lower the risk of contamination in milk.
Equipment maintenance is important. Regular checks and cleaning of milking equipment prevent infections and ensure reliable results from the somatic cell count tester.
Note: Small changes in daily routines can lead to better milk quality and healthier dairy herds.
Advice for New Users
New users benefit from a few simple strategies. They should read the user manual before starting any milk tests. Consistent sample handling and preparation lead to more accurate results. Dairy workers should keep records of each test to track changes in milk quality over time. Regular calibration of the somatic cell count tester ensures reliable readings. Clean equipment and proper storage of accessories help maintain the device and protect milk samples. Asking experienced dairy workers for tips can also make the learning process smoother.
Callout: Confidence grows with practice. Reliable milk testing supports healthy dairy herds and better farm management.
Conclusion
A first-time user of a somatic cell count tester often finds the process straightforward. The kit helps dairy workers test milk quickly and track udder health. Most users notice that milk sample preparation and device calibration require attention. Common challenges include:
With practice, users gain confidence. Regular milk testing supports better dairy management and healthier herds.
FAQ
How Often Should Users Calibrate the Somatic Cell Count Tester?
Calibration should occur before the first use and after moving the device. Regular calibration ensures accurate results when testing milk samples. Users should follow the instructions in the manual for best performance.
What Type of Milk Samples Work Best With the Somatic Cell Count Tester?
Fresh milk collected with sterile tools gives the most reliable results. Users should avoid old or contaminated samples. Proper sample preparation helps the somatic cell count tester deliver accurate readings.
Can The Somatic Cell Count Tester Store Previous Milk Test Results?
Most models store previous milk test results. Users can review data to track changes in milk quality over time. This feature helps dairy managers make informed decisions about herd health.
What Should Users Do If the Somatic Cell Count Tester Shows a High Cell Count in Milk?
A high cell count in milk may signal udder health issues. Users should check milking procedures and bedding conditions. They may need to consult a veterinarian for further advice.
Is the Somatic Cell Count Tester Difficult for Beginners to Use With Milk Samples?
The somatic cell count tester features a simple interface. Clear instructions guide users through each step. Beginners can test milk samples with minimal training and achieve reliable results.


